의존 자동 주입
의존 자동 주입
의존 대상을 설정 코드에서 직접 주입하지 않고 스프링이 자동으로 의존하는 빈 객체를 주입하는 것을 말한다.
(직접주입: 저번시간에 배웠던 memberDao()등을 이용해 생성자 혹은 setter에 의존 주입 하는 방법)
스프링에서 의존 자동 주입 설정을 위해서 보통 @Autowired 혹은 @Resource 어노테이션을 사용한다고 한다.
우리는 Autowired 어노테이션으로 다뤄보자.
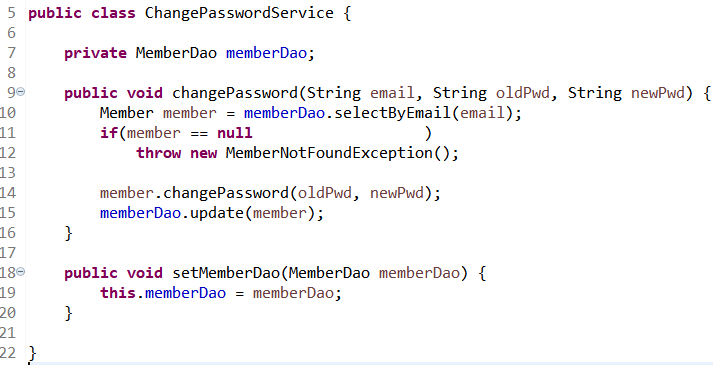
1. 필드를 이용한 의존 자동 주입
의존하는 필드에 @Autowired 어노테이션이 붙어 있으면 스프링이 해당 타입의 빈 객체를 찾아서 필드에 할당한다.
예시)
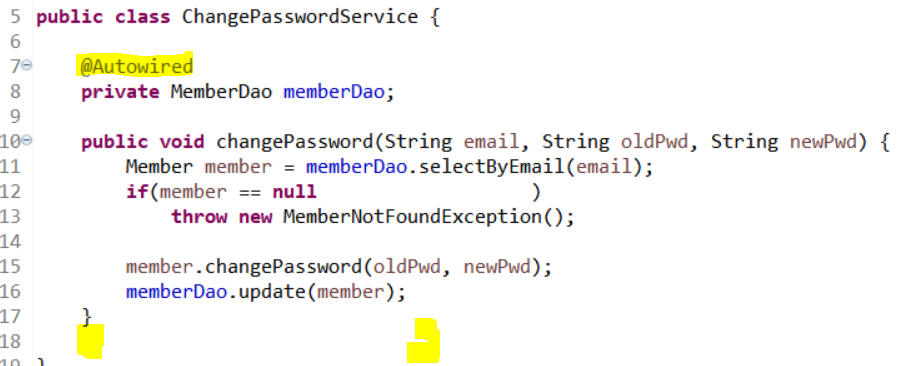
두 코드의 차이는 단지 2가지 밖에 없다.
- 필드에 @Autowired 어노테이션을 붙이다.
- setter 메소드를 삭제하다. (필드에 붙였기 때문에;
필드에 붙이지 않았으면 setter메소드를 남기고 그 메소드에 붙여도 됨)
이렇게 필드를 통한 의존 자동주입 기능을 활용하면 AppCtx에서 ChangerPasswordService 객체가 따로 setMemberDao등의 메서드로 빈 객체를 주입을 할 필요가 없다. 왜냐하면 스프링이 알아서 @Autowired가 달린 필드 타입의 빈 객체를 찾아 필드에 할당하기 때문이다. 즉, MemberDao 타입의 빈 객체 알아서 찾아서 주입한다.
2. 메소드를 이용한 의존 자동 주입
메서드에 @Autowired 어노테이션을 붙이면 스프링은 해당 메서드를 호출한다. 이때 메서드 파라미터 타입에 해당하는 빈 객체를 찾아 인자로 주입한다.
예시)

메소드에 @Autowired 어노테이션을 붙이면 끝이다.
스프링이 자동으로 이 메소드를 호출하고 파라미터 타입인 MemberDao의 빈 객체를 찾아 알아서 주입한다.
주의: 직접주입 vs 의존 자동 주입
만약 setter메소드에 @Autowired와 @Qualifier 어노테이션을 붙였는데, 그 setter메소드를 설정 클래스에서 다시 사용하여 직접 의존 주입을 했다면,
=> 직접 의존 주입에서 들어간 인자 객체가 사용되는 것이 아니라 자동 주입 지정된 빈 객체가 사용된다.
자동 의존 주입 주의사항
1. 자동으로 주입해야되는 빈 객체가 컨테이어에 존재하지 않는 경우 => 오류
2. 똑같은 타입의 빈 객체가 2개 이상 있는경우 => 오류
=> 2번 오류에 대한 해결
의존 객체 선택(@Qualifier)
문제의 코드
AppCtx 일부
	@Bean
	public MemberPrinter memberPrinter1() {
		return new MemberPrinter();
	}

	@Bean
	public MemberPrinter memberPrinter2() {
		return new MemberPrinter();
	}
오류 발생하는 곳(MemberListPrinter.java)
	@Autowired
	public void setPrinter(MemberPrinter printer) {
		this.printer = printer;
	}
만약 AppCtx에서 위와 같이 MemberPrinter의 객체를 2개 이상 생성하게되면,
MemberPrinter의 객체를 의존 자동 주입 받는 곳에서는 문제가 발생한다. 이를 해결하기 위해 @Qualifier 어노테이션이 필요하다.
해결
	@Bean
	@Qualifier("printer")
	public MemberPrinter memberPrinter1() {
		return new MemberPrinter();
	}

	@Bean
	public MemberPrinter memberPrinter2() {
		return new MemberPrinter();
	}
@Autowired
@Qualifier("printer")
public void setPrinter(MemberPrinter printer) {
this.printer = printer;
}Qualifier 어노테이션을 통해 이름이 pirnter인 MemberPinter 빈 객체를 찾아서 의존 주입시킨다.
상위/하위 타입 관계와 자동주입
위에서는 똑같은 타입의 객체가 2개 이상 있으면 자동주입이 어려워, @Qualifier 어노테이션을 통해 객체를 선택하는 법을 배웠다. 만약 똑같은 타입이 아니지만 그 2개 이상의 타입의 관계가 상위/하위 관계라면 어떨까?
문제코드
MemberSummaryPrinter 클래스
public class MemberSummaryPrinter extends MemberPrinter {

	@Override
	public void print(Member member) {
		System.out.printf("회원 정보: 이메일:%s 이름:%s\n", member.getEmail(), member.getName());
	}
}
MemberPrinter를 상속하는 클래스를 생성한다.
AppCtx 일부
	@Bean
	public MemberPrinter memberPrinter1() {
		return new MemberPrinter();
	}

	@Bean
	public MemberSummaryPrinter memberPrinter2() {
		return new MemberSummaryPrinter();
	}
MemberPrinter의 빈 객체가 2개인 것도 아니고 MemberPrinter와 MemberSummaryPrinter 빈 객체가 각각 하나씩 생성되어서 전혀 문제가 없는것 처럼 보이지만 사실 아니다.
이유 => MemberSummaryPrinter가 MemberPrinter를 상속하여 MemberSummaryPrinter는 MemberPrinter타입에도 할당이 가능하므로 스프링 컨테이너는 MemberPrinter를 자동 주입해야 될때, memberPrinter1과 memberPrinter2를 둘다 고려해야 하는 문제점이 발생한다.
해결 => @Qualifier 어노테이션을 활용해 주입할 빈객체를 명확히 한다. (코드는 생략한다.)
혹은 memberPrinter1메소드를 제거해도 괜찮다. 왜냐하면 MemberSummaryPrinter 빈 객체는 딱 하나기 때문
@Autowired 어노테이션의 필수 여부
만약 setter혹은 생성자를 통해 의존 객체를 주입받도록 설정했는데, 사실 주입하는 빈이 존재하지 않는 경우(예를들어 빈이 없어도 다른 기능을 이용하는데 문제가 없는 경우)에는 그냥 @Autowired를 사용하면 안된다.
@Autowired만 단독으로 사용되면 해당 타입의 빈이 없을 경우엔 무조건 오류를 발생시키 때문이다.
해결
1. @Autowired(required = false)
자동 주입할 대상이 필수가 아닌 경우에는 @Autowired 어노테이션의 required 속성을 false로 지정한다.
	@Autowired
   	private DateTimeFormatter dateTimeFormatter ;

   	public MemberPrinter() {
		dateTimeFormatter = DateTimeFormatter.ofPattern("yyyy년 MM월 dd일");
	}

   	public void print(Member member) { // 예외처리 되어 dateTimeFormatter가 null이여도 됨
		if (dateTimeFormatter == null) {
			// 예외처리 출력정보
		} else {
		   // 출력정보
    	}
	}

   	@Autowired(required = false)
	public void setDateFommatter(DateTimeFormatter dateTimeFormatter) {
		this.dateTimeFormatter = dateTimeFormatter;
	}
(위의 예시는 필드와 메소드 둘 다에 붙였지만 한 쪽에만 붙여도 상관없다.)
required 속성이 false이고 찾는 빈 객체가 존재하지 않으면 세터메서드 자체를 호출하지 않는다.
(해당 빈 객체가 없다고 가정)
=> 즉 이코드에선, 빈 객체가 없을 경우 날짜는 yyyy년 MM월 dd일 형식으로 출력됨
2. Optional 이용
   	private DateTimeFormatter dateTimeFormatter;

   	public void print(Member member) { // 예외처리 되어 dateTimeFormatter가 null이여도 됨
		if (dateTimeFormatter == null) {
			// 예외처리 출력정보
		} else {
		   // 출력정보
    		}
	}

   	@Autowired(required = false)
	public void setDateFommatter(Optional<DateTimeFormatter formatterOpt) {
		if(formmaterOpt.isPresent()){
           		this.dateTimeFormatter = dateTimeFormatter;
       		}
       		else{
        		this.dateTimeFormatter = null;
        	}
	}
3. @Nullable 어노테이션 사용
   	private DateTimeFormatter dateTimeFormatter;

    public MemberPrinter() {
		dateTimeFormatter = DateTimeFormatter.ofPattern("yyyy년 MM월 dd일");
	}

   	public void print(Member member) { // 예외처리 되어 dateTimeFormatter가 null이여도 됨
		if (dateTimeFormatter == null) {
			// 예외처리 출력정보
		} else {
		   // 출력정보
    		}
	}

   	@Autowired(required = false)
	public void setDateFommatter(@Nullable DateTimeFormatter dateTimeFormatter) {
		this.dateTimeFormatter = dateTimeFormatter;
	}
@Nullable 어노테이션은 의존 주입 대상 파라미터에 붙이면 세터 메서드가 호출될 때 찾는 빈 객체가 존재하면 빈을 인자로 전달하고 존재하지 않으면 null을 전달한다. 빈 객체가 존재하지 않아도 setter메소드를 호출한다는 점에서 위의 1번 방법과 차이가 있다.
(해당 빈 객체가 없다고 가정)
=> 즉 이코드에선, dateTimeFomatter가 null이므로 날짜 포멧의 기본형태인 yyyy-MM-dd 형태로 출력됨
+1,3 부연설명
우리는 앞서 스프링 컨테이너가 빈을 초기화하기 위해 기본생성자를 이용해서 객체를 생성하고(AppCtx에서 빈객체) 의존 자동 주입을 처리하기 위해 @Autowired가 달려있는 setter메소드를 호출함을 배웠다.
위에서 1,3방법 모두 생성자로 필드 dateTimeFomatter가 만들어 졌지만, 1번 방법은 required = false로 아예 setter메서드를 실행조차 하지 않았고, 3번 방법은 dateTimeFormatter에 null 값을 전달하여, 각자 dateTimeFormmater에 다른 값이 들어있음을 알 수 있다. 주의하자 !
+ 추가공부
스프링 설정클래스를 xml로 만들었을경우.
|
1
2
3
4
5
6
7
8
9
10
11
12
13
14
15
16
17
18
|
<?xml version="1.0" encoding="UTF-8"?>
<beans xmlns="http://www.springframework.org/schema/beans"
xmlns:context="http://www.springframework.org/schema/context"
xmlns:xsi="http://www.w3.org/2001/XMLSchema-instance"
xsi:schemaLocation="http://www.springframework.org/schema/beans
http://www.springframework.org/schema/beans/spring-beans.xsd
http://www.springframework.org/schema/context
http://www.springframework.org/schema/context/spring-context.xsd">
<context:annotation-config />
<bean id="memberdDao" class="spring.memberDao" >
.
.
.
</beans>
|
cs |
4, 8, 9행을 추가해야 한다. 그리고 11행을 추가하면 더 많은 스프링 설정기능을 사용할 수 있다.
<context:annotation-config>
@Autowired 어노테이션을 사용하는 방법은 같다.
단, setter 메소드를 통한 @Autowired를 사용할 경우 default 생성자를 꼭 만들어주자 ! 그리고 주입할 속성에도 @Autowired를 부텨주자 ! 안그럼 오류
+ @Autowired 대신 @Resource 어노테이션을 통해 주입도 가능. @Resource는 주입할 속성(property) 붙여서 사용한다. 얘도 default 생성자가 있어야한다.
+ @Injection도 @Autowired와 똑같은 기능을 하지만, @Injection은 required 속성을 지원하지 않는다.
Qualifier가 필요한경우 -> xml에서 사용법
<bean> 태그 사이에 <qulifier value="지정된 이름"> 이렇게 사용한다.
ex) <qualifier value="printer">